Balloon Oomf User Manual and Cleaning Instructions
Wesly VenablesShare
Balloon Oomf balloon treatment is non-toxic, water soluble and can be cleaned with warm water.
Download the instruction manual PDF here
1. Getting your Balloon Oomf ready for first use:
1.1 Cut the clear pump extender pipe to the required length and insert on bottom of pump:
- 1 Litre Bottle = 2cm
- 2 Litre Bottle = 7cm
- 5 Litre Bottle = 20cm
1.2 Screw pump in to bottle, remove the pump restriction clip and pump cap.
1.3 Pump several times to fill the pump with Balloon Oomf. (Until a little Balloon Oomf comes out)
1.4 Replace the pump restriction clip and pump cap.
1.5 The Balloon Oomf is now ready to use.
NB: Always replace pump cap after each use and store bottle in an upright position.
View video:
2. Give your balloons maximum float time in 5 easy steps:


2.1 Stretch - Using an air inflator inflate and then deflate the balloons, this is done to open the pores of the balloon for maximum float time.
2.2 Insert - Place stretched, un-inflated balloon neck over spout of pump ensuring that you pump the product into the belly of the balloon. Make sure you pump in the required amount and avoid getting the liquid in the neck of the balloon.
2.3 Spread - Rub the solution around inside the balloon to give an even coating.
2.4 Inflate - Slightly over inflate the balloon and hand tie.
2.5 Dry - Allow to dry for up to 3 hours before transporting (This is very useful to avoid splatter)
View video:
3. Caring for your Balloon Oomf Pump:
3.1 Keep the spout of the pump clean with a warm damp cloth.
3.2 Always replace pump cap after each use.
4. Floating times:
5. Balloon fills left in bottle
Measure the distance from the base of the bottle up to the amount of Oomf left in the bottle, then take that distance in millimeters and use the chart below to get an estimate quantity of 11” balloon fills left in the bottle.
6. How much Balloon Oomf to use in your balloons:
7. Pump Kit Cleaning Instructions
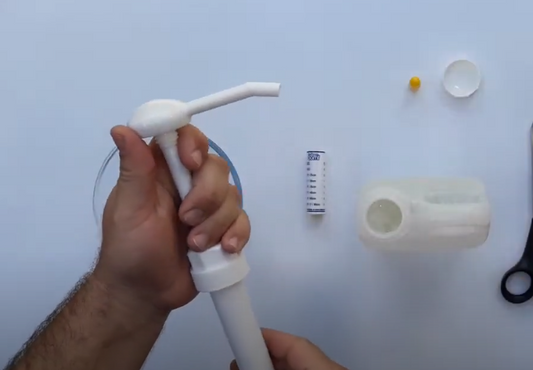
7.1 Disassemble the pump as per below picture, take care to not lose the ball bearing
7.2 Soak parts in water overnight
7.3 Manually remove any product that is stuck to the pump
7.4 Reassemble the pump
7.5 Pump warm water through the unit to flush out any hardened product
7.6 If needed repeat the above process